Nested vSphere Home Lab - Part 2 - Active Directory & Certificate Authority
Intro
Welcome back! In my previous post, I covered the deployment and configuration of a virtual Sophos XG Firewall router appliance to provide routing services for the nested lab environment.
Active Directory
Next, I will cover the way I like to quickly configure my Active Directory Server and respective services. Typically, I leverage Windows Server Core OS for my needs but as this server will also serve as a “jump host” for the nested lab, I decided to install the Desktop Experience (GUI) version of Windows Server 2022 Datacenter Edition.
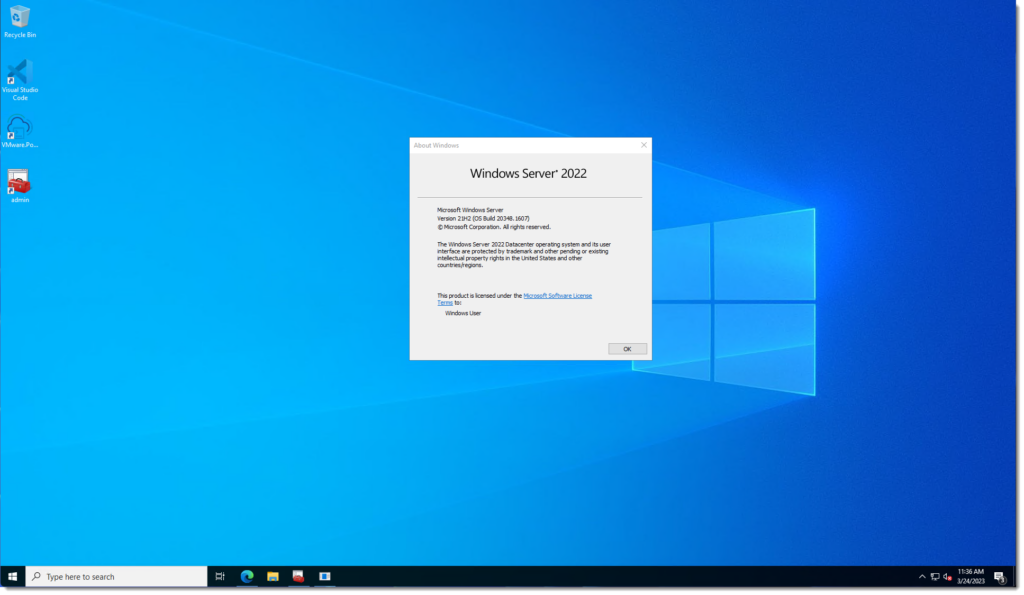
As mentioned, since I typically use Core versions of Windows Server, thus it is managed via PowerShell commands so to set up my server as a Domain Controller, I’ll run the following from an elevated PowerShell session.
###1st DC###
Import-Module ServerManager
Add-WindowsFeature -Name RSAT-AD-Tools

Install-WindowsFeature -Name AD-Domain-Services, DNS -IncludeManagementTools -Verbose

Import-Module ADDSDeployment -Verbose

# Create password
$Password = Read-Host -Prompt 'Enter SafeMode Admin Password' -AsSecureString

Install-ADDSForest -CreateDnsDelegation:$false -DatabasePath "C:\Windows\NTDS" -DomainMode "WinThreshold" -DomainName "demo.lab" -DomainNetbiosName "DEMO" -ForestMode "WinThreshold" -InstallDns:$true -LogPath "C:\Windows\NTDS" -NoRebootOnCompletion:$true -SysvolPath "C:\Windows\SYSVOL" -SafeModeAdministratorPassword $Password -Force:$true -Verbose

# Install DHCP
Install-WindowsFeature DHCP -IncludeManagementTools -Verbose
netsh dhcp add securitygroups
Restart-Service dhcpserver -Verbose

Add-DhcpServerInDC -DnsName "dc1.demo.lab" -Verbose
Get-DhcpServerInDC

Set-ItemProperty -Path registry::HKEY_LOCAL_MACHINE\SOFTWARE\Microsoft\ServerManager\Roles\12 -Name ConfigurationState -Value 2

Set-DhcpServerv4DnsSetting -ComputerName "dc1.demo.lab" -DynamicUpdates "Always" -DeleteDnsRRonLeaseExpiry $True

$Credential = Get-Credential
Set-DhcpServerDnsCredential -Credential $Credential -ComputerName "dc1.demo.lab"

# Enable Sysvol for GPO shared store
Get-Itemproperty -path 'HKLM:SYSTEM\CurrentControlSet\Services\Netlogon\Parameters' -Name 'SysVolReady' -Verbose
Set-Itemproperty -path 'HKLM:SYSTEM\CurrentControlSet\Services\Netlogon\Parameters' -Name 'SysVolReady' -Value '1' -Verbose

# Enable Recycle Bin
$Params = @{
    "Identity" = 'Recycle Bin Feature'
    "Scope"    = 'ForestOrConfigurationSet'
    "Target"   = 'demo.lab'
  }

Enable-ADOptionalFeature @Params -Verbose
As I mentioned previously, this lab will use a single server for all Active Directory services but in my physical lab, I tend to run (2) Domain Controllers so if you’d like to configure a second server for the nested lab, you can do so by standing up a 2nd Windows Server OS and running the following on the 2nd server (DC2):
###2nd DC###
Import-Module ServerManager
Add-WindowsFeature -Name RSAT-AD-Tools

Install-WindowsFeature -Name AD-Domain-Services, DNS -IncludeManagementTools -Verbose

Import-Module ADDSDeployment -Verbose

# Create password

$Password = Read-Host -Prompt 'Enter SafeMode Admin Password' -AsSecureString

Get-DnsClientServerAddress

# Set the correct InterfaceIndex from previous command
Set-DnsClientServerAddress -InterfaceIndex 5 -ServerAddresses ("10.100.1.10","127.0.0.1") -Verbose

Install-ADDSDomainController -NoGlobalCatalog:$false -CreateDnsDelegation:$false -Credential (Get-Credential "DEMO\Administrator") -CriticalReplicationOnly:$false -DatabasePath "C:\Windows\NTDS" -DomainName "demo.lab" -InstallDns:$true -LogPath "C:\Windows\NTDS" -NoRebootOnCompletion:$true -SiteName "Default-First-Site-Name" -ReplicationSourceDC "dc1.demo.lab" -SysvolPath "C:\Windows\SYSVOL" -SafeModeAdministratorPassword $Password -Force:$true -Verbose

# Install DHCP Services

Install-WindowsFeature DHCP -IncludeManagementTools -Verbose
netsh dhcp add securitygroups
Restart-Service dhcpserver -Verbose

Add-DhcpServerInDC -DnsName "dc2.demo.lab" -Verbose
Get-DhcpServerInDC

Set-ItemProperty -Path registry::HKEY_LOCAL_MACHINE\SOFTWARE\Microsoft\ServerManager\Roles\12 -Name ConfigurationState -Value 2

Set-DhcpServerv4DnsSetting -ComputerName "dc2.demo.lab" -DynamicUpdates "Always" -DeleteDnsRRonLeaseExpiry $True

$Credential = Get-Credential
Set-DhcpServerDnsCredential -Credential $Credential -ComputerName "dc2.demo.lab"

# Enable Sysvol for GPO shared store

Get-Itemproperty -path 'HKLM:SYSTEM\CurrentControlSet\Services\Netlogon\Parameters' -Name 'SysVolReady' -Verbose
Set-Itemproperty -path 'HKLM:SYSTEM\CurrentControlSet\Services\Netlogon\Parameters' -Name 'SysVolReady' -Value '1' -Verbose
Then switch back to DC1 and run the following to set its DNS configuration to point to DC2 as the primary and itself as the secondary, this way both servers are pointing to the opposite server as it’s primary:
###1st DC###
Get-DnsClientServerAddress

#Set the correct InterfaceIndex from previous command
Set-DnsClientServerAddress -InterfaceIndex 5 -ServerAddresses ("10.100.1.20","127.0.0.1") -Verbose
Certificate Authority
In this lab setup, I am also going to configure this Jumpbox / Active Directory Domain Controller to serve as an Enterprise Root Certificate Authority, but in a traditional lab, I would separate this on it’s own VM.
To configure the server as a Certificate Authority for the lab, I will run the following PowerShell commands while logged in as the domain “Administrator” account:
Get-DnsClientServerAddress

# Set the correct InterfaceIndex from previous command
Set-DnsClientServerAddress -InterfaceIndex 5 -ServerAddresses ("127.0.0.1") -Verbose

# Run the following if you have an external CA with (2) DNS Servers
Set-DnsClientServerAddress -InterfaceIndex 5 -ServerAddresses ("10.100.1.10","10.100.1.20") -Verbose

# Join pc to domain if needed
Add-Computer -DomainName "demo.lab" -Credential (Get-Credential "DEMO\Administrator") -Restart -Confirm:$false -Verbose

Import-Module ServerManager
Add-WindowsFeature -Name RSAT-AD-Tools

#region
# Install IIS Remote Mgmt if CA is installed on Server Core OS
Install-WindowsFeature Web-Mgmt-Service
Enable-NetFirewallRule -DisplayGroup "Windows Remote Management"
Set-ItemProperty -Path HKLM:\SOFTWARE\Microsoft\WebManagement\Server -Name EnableRemoteManagement -Value 1
Set-Service -Name WMSVC -StartupType Automatic
Start-Service WMSVC

# Run the following on the remote system used to manage IIS
# Desktop OS
Enable-WindowsOptionalFeature -Online -FeatureName "IIS-WebServerManagementTools" -All -Verbose
# Server OS
Install-WindowsFeature Web-Mgmt-Service -IncludeManagementTools -Verbose
#endregion

# Install ADCS
Install-WindowsFeature Adcs-Cert-Authority -IncludeManagementTools -Verbose

$CA_Name = "demo.lab-ca"
$CP_Name = "RSA#Microsoft Software Key Storage Provider"
Install-AdcsCertificationAuthority -CACommonName $CA_Name -CAType EnterpriseRootCa -CryptoProviderName $CP_Name -Credential (Get-Credential "DEMO\Administrator") -KeyLength 2048 -HashAlgorithmName SHA256 -ValidityPeriod Years -ValidityPeriodUnits 10 -Force -Verbose

Install-WindowsFeature ADCS-Web-Enrollment -IncludeManagementTools -Verbose

Install-AdcsWebEnrollment -Force -Verbose
# Enable the HTTP CDP and AIA locations that the CA ships with (disabled by default)
$cfg = "HKLM:\SYSTEM\CurrentControlSet\Services\CertSvc\Configuration\$CA_Name"
$crl = (Get-ItemProperty $cfg).CRLPublicationURLs    -replace '^\d+:(http://%1/CertEnroll/%3%8%9\.crl)$', '6:$1'
$aia = (Get-ItemProperty $cfg).CACertPublicationURLs -replace '^\d+:(http://%1/CertEnroll/%1_%3%4\.crt)$', '2:$1'
Set-ItemProperty $cfg -Name CRLPublicationURLs    -Value $crl -Type MultiString
Set-ItemProperty $cfg -Name CACertPublicationURLs -Value $aia -Type MultiString
Restart-Service certsvc
certutil -crl
I edit the registry directly rather than using certutil -setreg because these values are full of % tokens that are easy to mangle, and -setreg replaces the whole list. Only certificates issued after this change carry the HTTP locations.
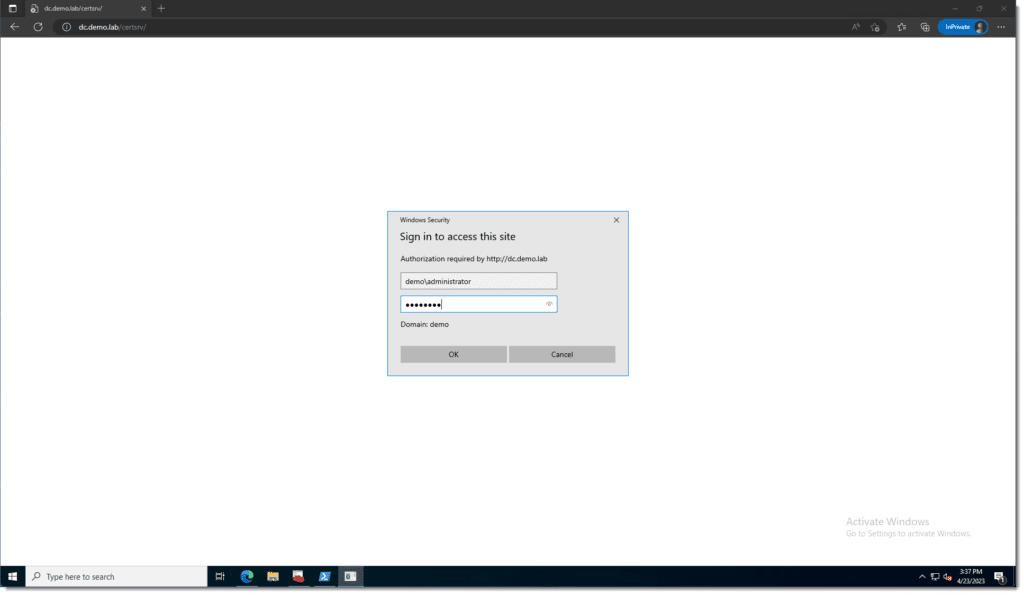
At this point, if you navigate to the URL of the CA server at http://[IP or FQDN]/certsrv , you should be prompted to authenticate and see the following page(s).
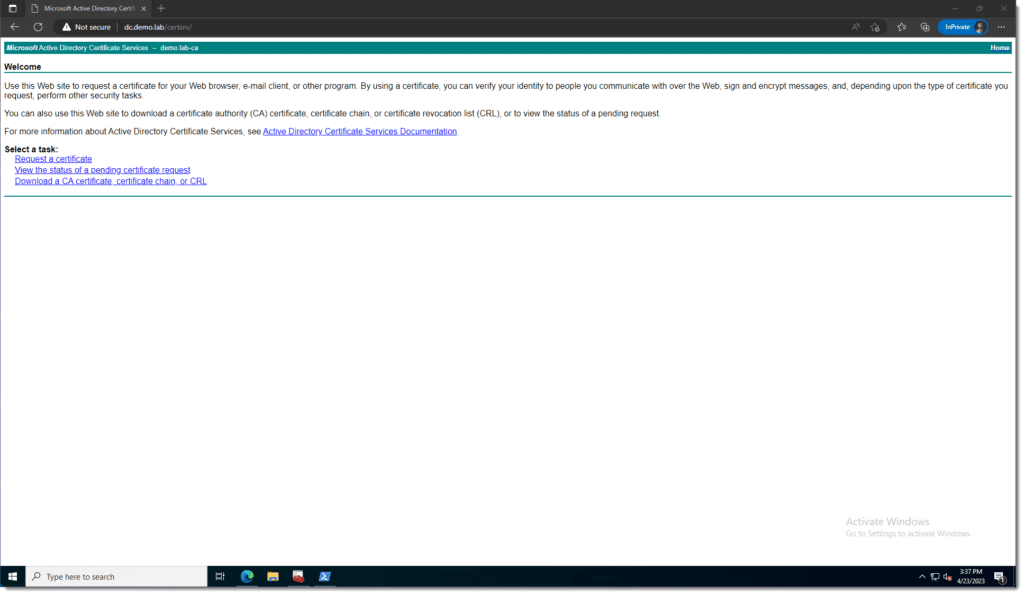
From here, I usually download and install the CA Certificate locally and then create a GPO and push the certificate to all windows machines in the domain.
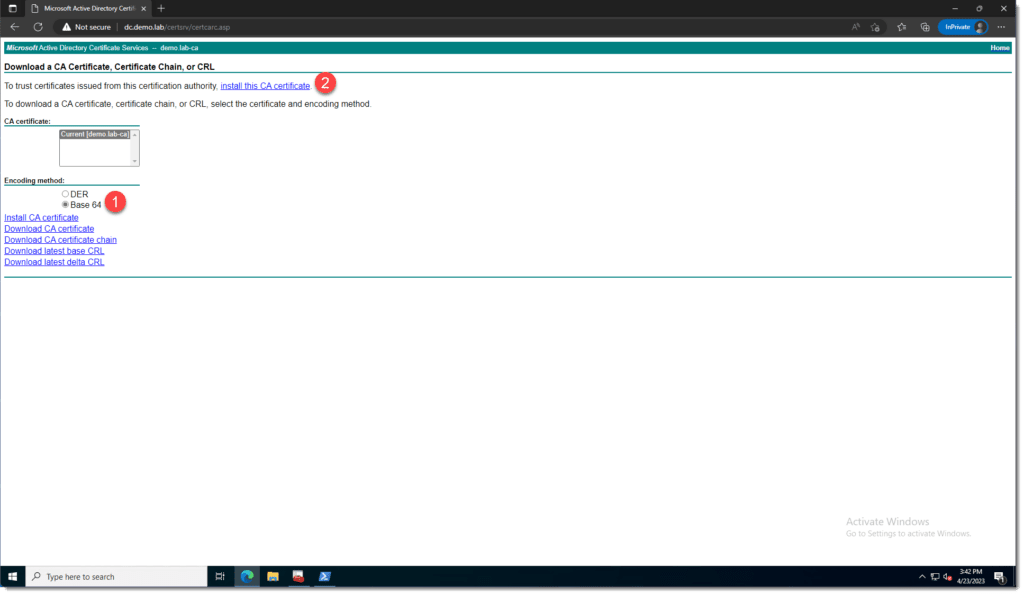
Right-click the downloaded certificate file and click Install Certificate. Choose Local Machine as the store location and click Next. Select Place all certificates in the following store: then Browse and select Trusted Root Certification Authorities, then click OK, Next, Finish.
To create a GPO, open the Group Policy Management utility. I already had the admin MMC console configured with this snap-in so I was able to access this quickly and setup a GPO.
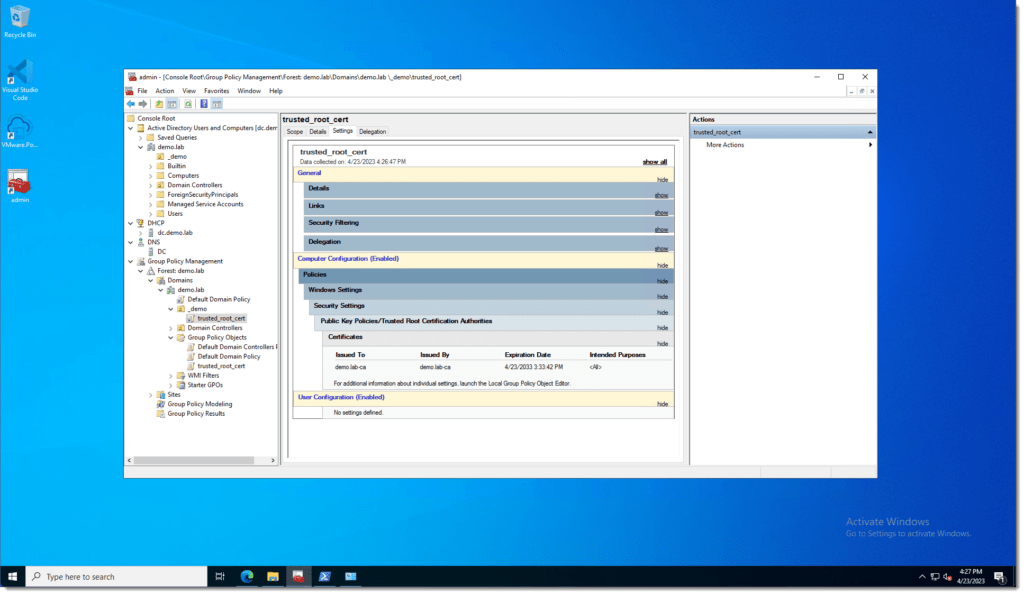
This at least gets us started so we can hop back in and configure additional users, groups, GPOs, DNS record, DHCP Scopes, etc. as needed later on, but we’re not done just yet! I like to configure a secure connection to the Web Enrollment Server URL so to do so, I’ll need to configure that in IIS.
First, I request a Web Server certificate for the CA’s names. Originally I just picked the domain controller’s own certificate in IIS, and it came back to bite me: that certificate was replaced when auto-enrollment renewed it, IIS stayed bound to the old one, and HTTPS web enrollment quietly broke when it expired. A dedicated Web Server certificate avoids that. Run this as the domain Administrator. Requesting it straight into the machine store with Get-Certificate runs as the computer account, which the Web Server template doesn’t allow to enroll, so I use certreq instead:
$inf = @'
[Version]
Signature="$Windows NT$"
[NewRequest]
Subject = "CN=dc.demo.lab"
KeyLength = 2048
KeySpec = 1
KeyUsage = 0xA0
MachineKeySet = TRUE
ProviderName = "Microsoft RSA SChannel Cryptographic Provider"
RequestType = PKCS10
HashAlgorithm = sha256
[EnhancedKeyUsageExtension]
OID=1.3.6.1.5.5.7.3.1
[Extensions]
2.5.29.17 = "{text}"
_continue_ = "dns=dc.demo.lab&"
_continue_ = "dns=ca.demo.lab&"
'@
New-Item -ItemType Directory -Force -Path C:\temp | Out-Null
$inf | Set-Content C:\temp\iis.inf -Encoding ASCII
certreq -new C:\temp\iis.inf C:\temp\iis.csr
certreq -submit -attrib "CertificateTemplate:WebServer" -config "dc.demo.lab\demo.lab-ca" C:\temp\iis.csr C:\temp\iis.cer
certreq -accept -machine C:\temp\iis.cer
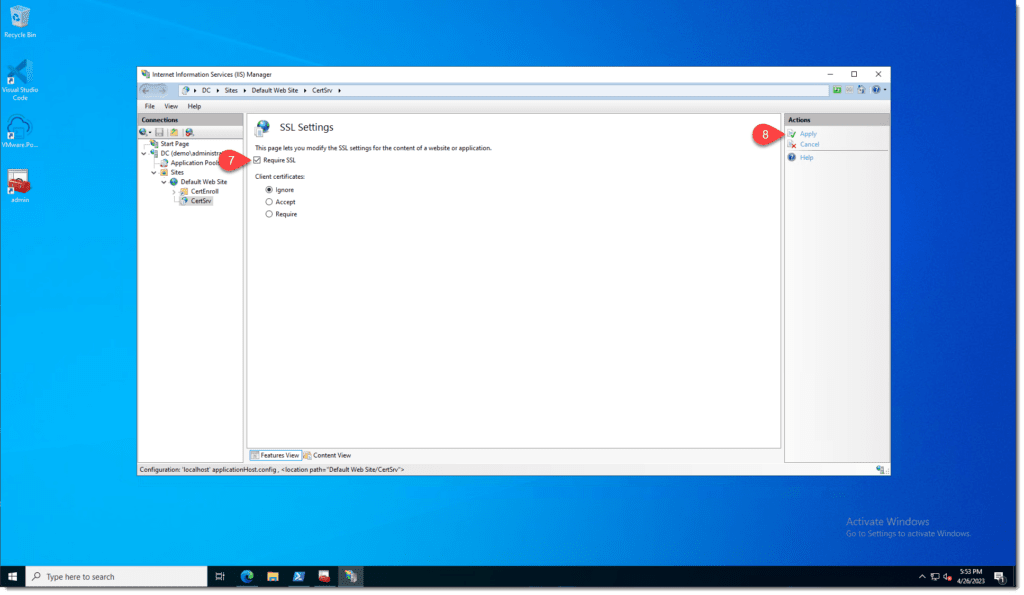
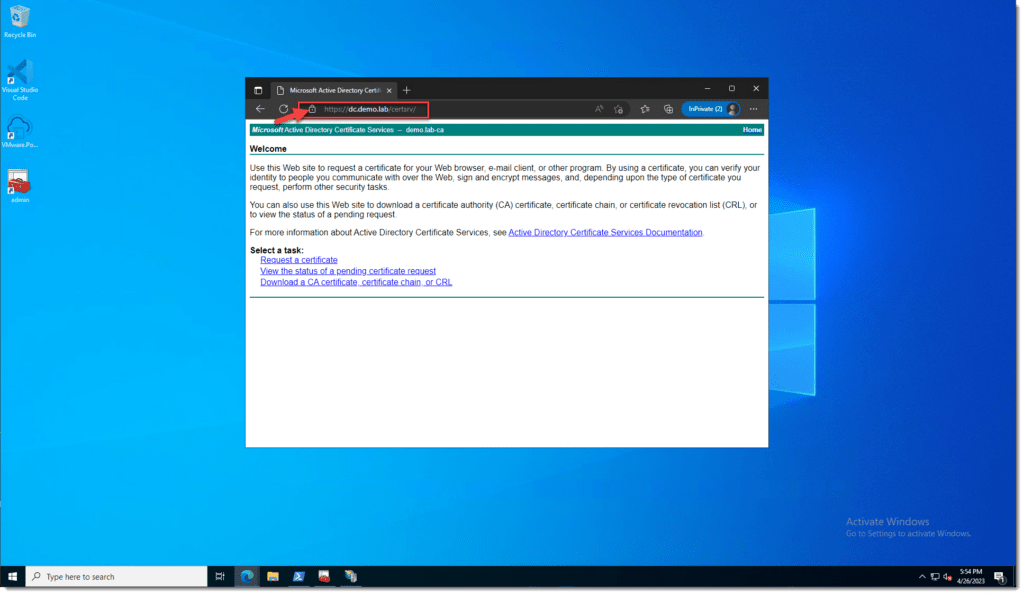
Open up IIS Manager on the CA Server, navigate to the Default Web Site and click on Bindings, then click Add. Set the Type to https, then select the Web Server certificate you just requested (issued to dc.demo.lab; check the expiry date to tell it apart from the domain controller’s own certificates) and click OK, then Close. Put a reminder in for its renewal, as a Web Server certificate doesn’t renew itself (2 years with the default template). Next, CertSrv, then double-click SSL Settings. Enable the Require SSL checkbox, then click Apply. Afterwards, navigate again to the Web Enrollment Server URL, this time using https://[FQDN]/certsrv, Authenticate if asked to do so, and now we can see that we have a certificate securing our connection.
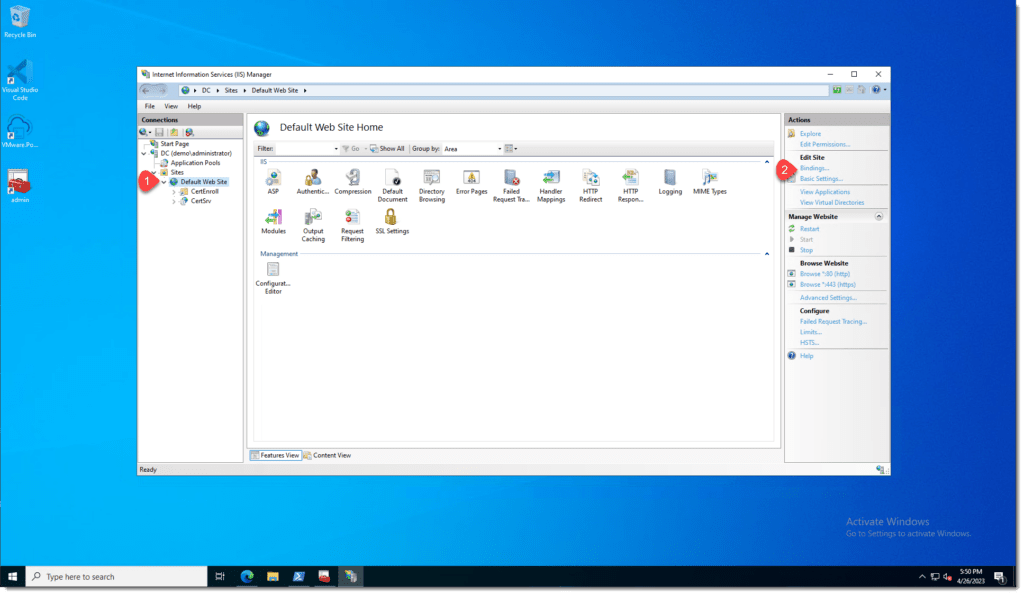
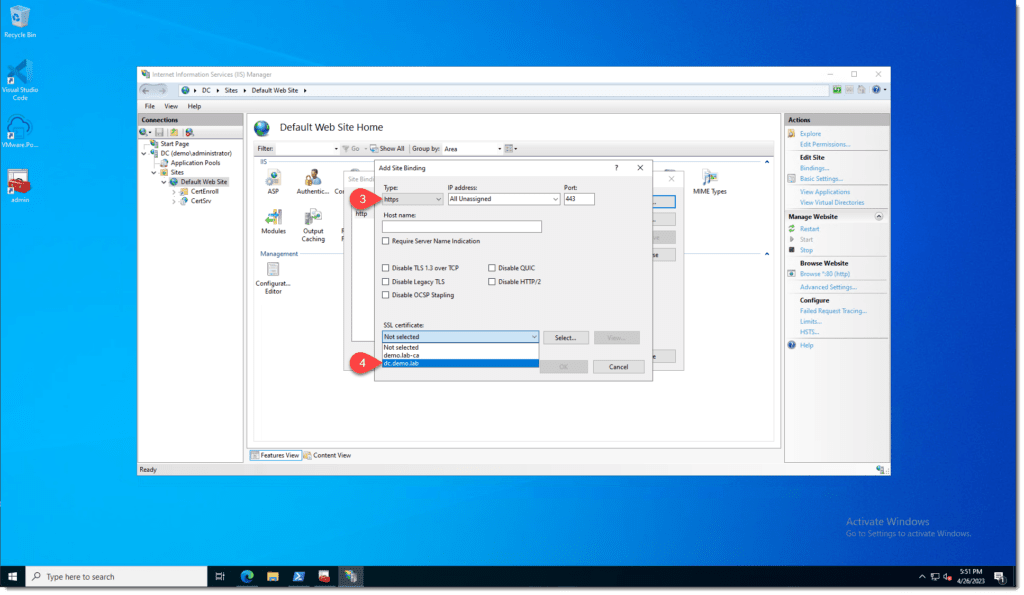
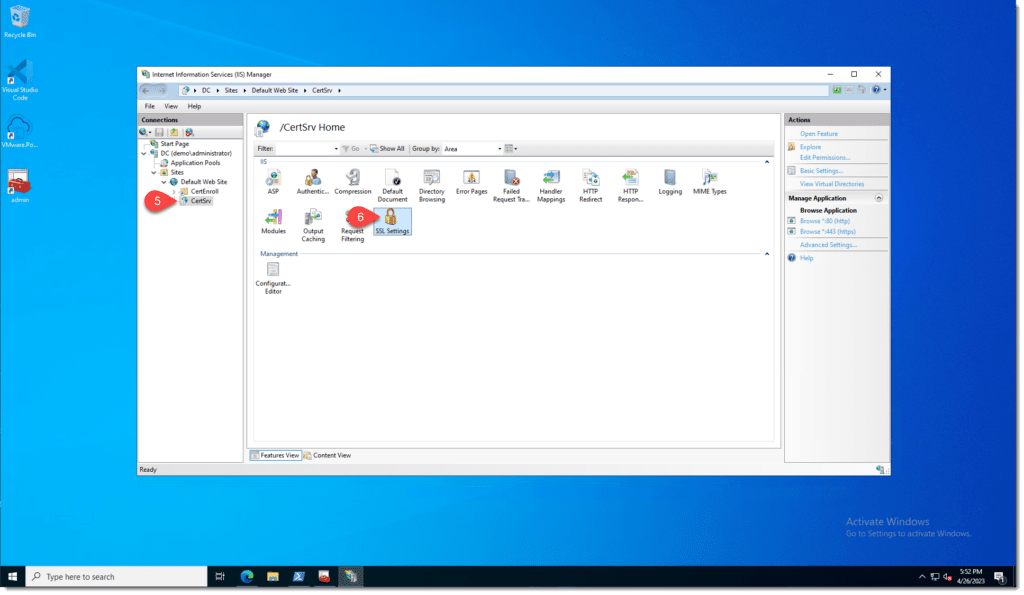
I also like to generate Certificate Signing Requests (CSRs) using the OpenSSL utility which is commonly used to generate CSRs or certificates for VMware products, so I will install via my favorite CLI driven application/package management tool…Chocolatey!
To install Chocolatey, from an elevated shell run the following:
Set-ExecutionPolicy Bypass -Scope Process -Force; [System.Net.ServicePointManager]::SecurityProtocol = [System.Net.ServicePointManager]::SecurityProtocol -bor 3072; iex ((New-Object System.Net.WebClient).DownloadString('https://community.chocolatey.org/install.ps1'))
Then, install OpenSSL with the following command:
# Optional
choco feature enable -n allowGlobalConfirmation
choco feature enable -n useRememberedArgumentsForUpgrades

# Install OpenSSL
choco install openssl

# Install IIS Manager if remotely managing IIS
choco install inetmgr
Next, I will create a certificate template which will be used to sign CSRs with later on by following the instructions in VMware KB Article 2112009. And to round things off, the last thing I will do is enable certificate auto-enrollment following the instructions in this guide.
One thing that guide doesn’t cover is the domain controllers themselves. The DC’s LDAPS certificate expires after a year, and unless auto-enrollment also applies to the Default Domain Controllers Policy, nothing renews it. While I’m at it, I make the Kerberos Authentication template supersede the older Domain Controller Authentication and Domain Controller templates and stop issuing those two, so each DC ends up with exactly one certificate that LDAPS can use:
# Auto-enrollment (enroll, renew, update) for the domain controllers
$gpo = Get-GPO -Name 'Default Domain Controllers Policy'
$key = 'HKLM\SOFTWARE\Policies\Microsoft\Cryptography\AutoEnrollment'
Set-GPRegistryValue -Guid $gpo.Id -Key $key -ValueName AEPolicy -Type DWord -Value 7
Set-GPRegistryValue -Guid $gpo.Id -Key $key -ValueName OfflineExpirationPercent -Type DWord -Value 10
Set-GPRegistryValue -Guid $gpo.Id -Key $key -ValueName OfflineExpirationStoreNames -Type String -Value 'MY'

# Kerberos Authentication supersedes the older DC templates
$root = ([ADSI]'LDAP://RootDSE').configurationNamingContext
$krb  = [ADSI]"LDAP://CN=KerberosAuthentication,CN=Certificate Templates,CN=Public Key Services,CN=Services,$root"
$krb.Properties['msPKI-Supersede-Templates'].Clear()
[void]$krb.Properties['msPKI-Supersede-Templates'].Add('DomainControllerAuthentication')
[void]$krb.Properties['msPKI-Supersede-Templates'].Add('DomainController')
$krb.Properties['msPKI-Template-Minor-Revision'][0] = [int]$krb.Properties['msPKI-Template-Minor-Revision'][0] + 1
$krb.CommitChanges()

# Stop issuing the superseded templates
Remove-CATemplate -Name DomainControllerAuthentication -Force
Remove-CATemplate -Name DomainController -Force

# Apply and trigger auto-enrollment
gpupdate /target:computer /force
certutil -pulse
After a minute, the DC’s personal store should hold a Kerberos Authentication certificate (plus Directory Email Replication), and the old DC certificates will have been archived. You can confirm which certificate LDAPS is serving from any machine with OpenSSL:
openssl s_client -connect dc.demo.lab:636 -servername dc.demo.lab | openssl x509 -noout -subject -dates -ext subjectAltName
If anything pins the DC’s LDAPS certificate, such as a vCenter Server identity source using Active Directory over LDAPS, it has to be updated every time the DC renews. In vCenter, upload the CA’s root certificate along with the DC certificates, and make a note to check logins after each renewal.
In the next post, I will cover how to deploy the nested ESXi VMs and vCenter Server.
I hope you’ve enjoyed the material thus far, and I thank you for reading!
–virtualex
Comments