How To: Create A VMFS5 Datastore On A USB Drive
Create A VMFS5 Datastore On A USB Drive
Ever wondered if it was possible to use a USB Drive as a VMFS5 datastore in VMware vSphere 6.0? I sure know that I have! Not that I would like to run any VM’s on said datastore, as I’m sure performance would not be optimal, but instead to test its functionality and use it for storing ESXi host logs for example. Well, I ran into an issue today where I needed to unmount all of my NFS mounts on ESXi 6.0 U2 in order to recreate some of the volumes before remounting them. The problem was that I was unable to unmount one of my volumes because it was bound to the ESXi host for scratch logs. As I didn’t have a spare drive of any sort to attach to my host so that I could reconfigure the location for scratch logs, I began tinkering with the idea of using a small USB drive as a temporary datastore for these logs.
After doing a little research, I came across a post from Florian Grehl aka @virten showing exactly how to accomplish this so I figured I’d share the process of doing so. Keep in mind that this should only be used for testing purposes and should not be used in production environments. This is unsupported by VMware. Here we go!
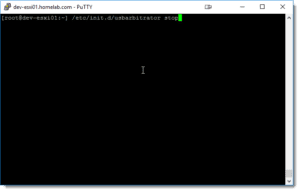
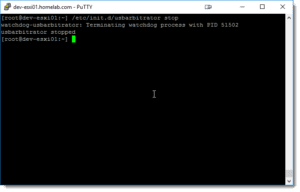
Ensure that the USB device is unplugged from the ESXi host then begin by connecting to your ESXi host and stopping the USB arbitrator service. This service is responsible for allowing USB device passthrough from an ESXi host to a virtual machine, so keep in mind that you will no longer be able to pass through USB devices to VM’s until this is restarted. (Note: restarting service after creating and mounting USB datastore will break connectivity and recognition of the USB datastore). To stop the service, run the following command:
/etc/init.d/usbarbitrator stop
Optionally, if you’d like to permanently disable the service so it persists thru reboots, run the following command:
chkconfig usbarbitrator off
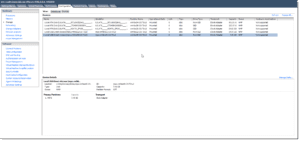
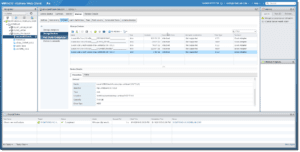
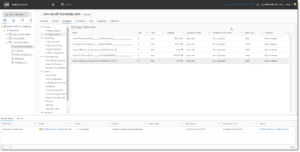
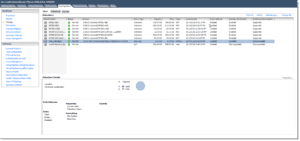
Plug the USB drive into your ESXi host. For the purposes of this tutorial, I am using a small Lexar 8GB USB device. If you navigate to the storage devices section on your host, you should now see the connected USB device is recognized by the hypervisor. Make note of the device identifier number (mpx.vmhbaXX) for this device.
vSphere Client:
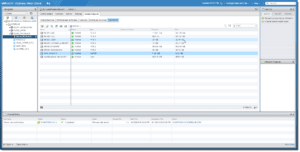
vSphere Web Client:
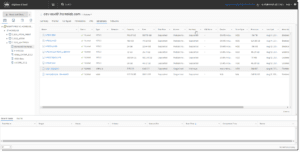
vSphere HTML5 Web Client:
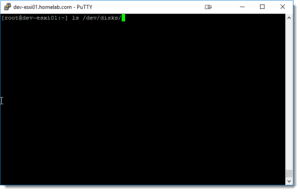
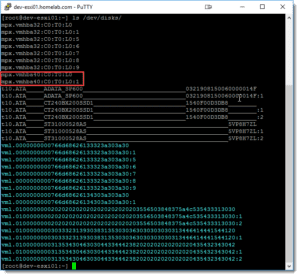
You can also list the device information to determine the identifier by running the following command:
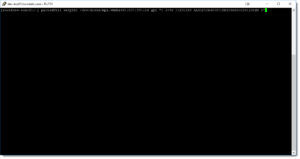
ls /dev/disks/
As we can see, my identifier is mpx.vmhba40:C0:T0:L0for this device which also matches the identifier from the GUI pics above. Note: The other USB (mpx.vmhba32:C0:T0:L0) is a separate USB where ESXi is installed on.
Next, we need to create a GPT (GUID Partition Table) label on the device. To do so, run the following command using the correct identifier for the drive. In my case, I will run with mpx.vmhba40 for all of the following commands. Be sure to change this to your correct ID.
partedUtil mklabel /dev/disks/mpx.vmhba40\:C0\:T0\:L0 gpt

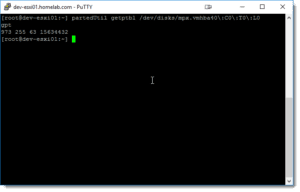
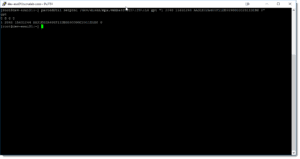
Now run the following command to get the partition table information.
partedUtil getptbl /dev/disks/mpx.vmhba40\:C0\:T0\:L0
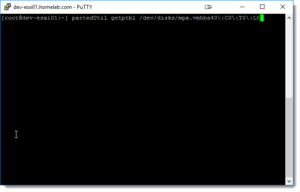
This returned the following output for me…
gpt

973 255 63 15634432
Next, we need to create a partition in which you will need to know the start sector and end sector which all depend on the size of the device drive and GUID. As an FYI…
- The start sector is always 2048
- The GUID for VMFS is always AA31E02A400F11DB9590000C2911D1B8
- The end sector is calculated using the values obtained by running the previous command.
- Formula: 973 x 255 x 63 – 1 = 15631244
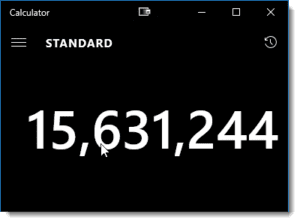
We can also run the following command to calculate the end sector value. This should return an identical value that matches the previous calculation.
eval expr $(partedUtil getptbl /dev/disks/mpx.vmhba40\:C0\:T0\:L0 | tail -1 | awk '{print $1 " \\* " $2 " \\* " $3}') - 1
If everything has gone smoothly so far, you should be ready to create the VMFS partition. Run the following command, ensuring to replace the identifier and end sector values with your own.
partedUtil setptbl /dev/disks/mpx.vmhba40\:C0\:T0\:L0 gpt "1 2048 15631244 AA31E02A400F11DB9590000C2911D1B8 0"
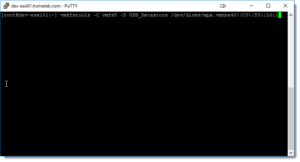
Lastly, we need to format the partition with VMFS using vmkfstools. Do so by running the following (Note: “” in the command below can be any name you like so feel free to use a different name for your datastore):
vmkfstools -C vmfs5 -S USB_Datastore /dev/disks/mpx.vmhba40\:C0\:T0\:L0:1
Sit tight…wait about one minute…and…voila!
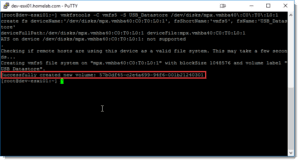
After a quick rescan/refresh you should now have and see your mounted VMFS5 USB Datastore!
vSphere Client:
vSphere Web Client:
vSphere HTML5 Web Client:
After I changed the “Syslog” configuration for my scratch logs to use this new datastore, I was finally able to unmount my NFS datastores. I hope this helps so please feel free to comment below.
Shoutout to Florian Grehl for his wonderful post!
Cheers!
-virtualex-
Comments